Getting started
You already have miyagi installed. Now you'll prepare a subject and, if you want, connect it to your Moodle course. You do this only once per subject.
This page first covers the desktop app route, and at the end the web version and the terminal, which do the same with other commands. If you'd rather see it all done for real, follow the tutorial An Introduction to SQL course.
1. Create your subject
In the app, with no subject yet, you get the New subject form. If you already have one, open it from the selector at the top of the conversations column. It asks you for:
- Name of the subject. A name to recognize it by, like
Bases de Datos 1.º DAW. - Description. Optional, for you.
- Language. The one you'd like it to talk to you in. Left blank, it answers in the language you write to it in. If it's Spanish, English, French or German, it also sets the language of its menus and messages.
- Tone of voice. How it will talk to your students in the forum, in feedback and in announcements: no preference (neutral), formal, warm, or warm and motivating.
- Link a Moodle classroom now. You can leave it for later.
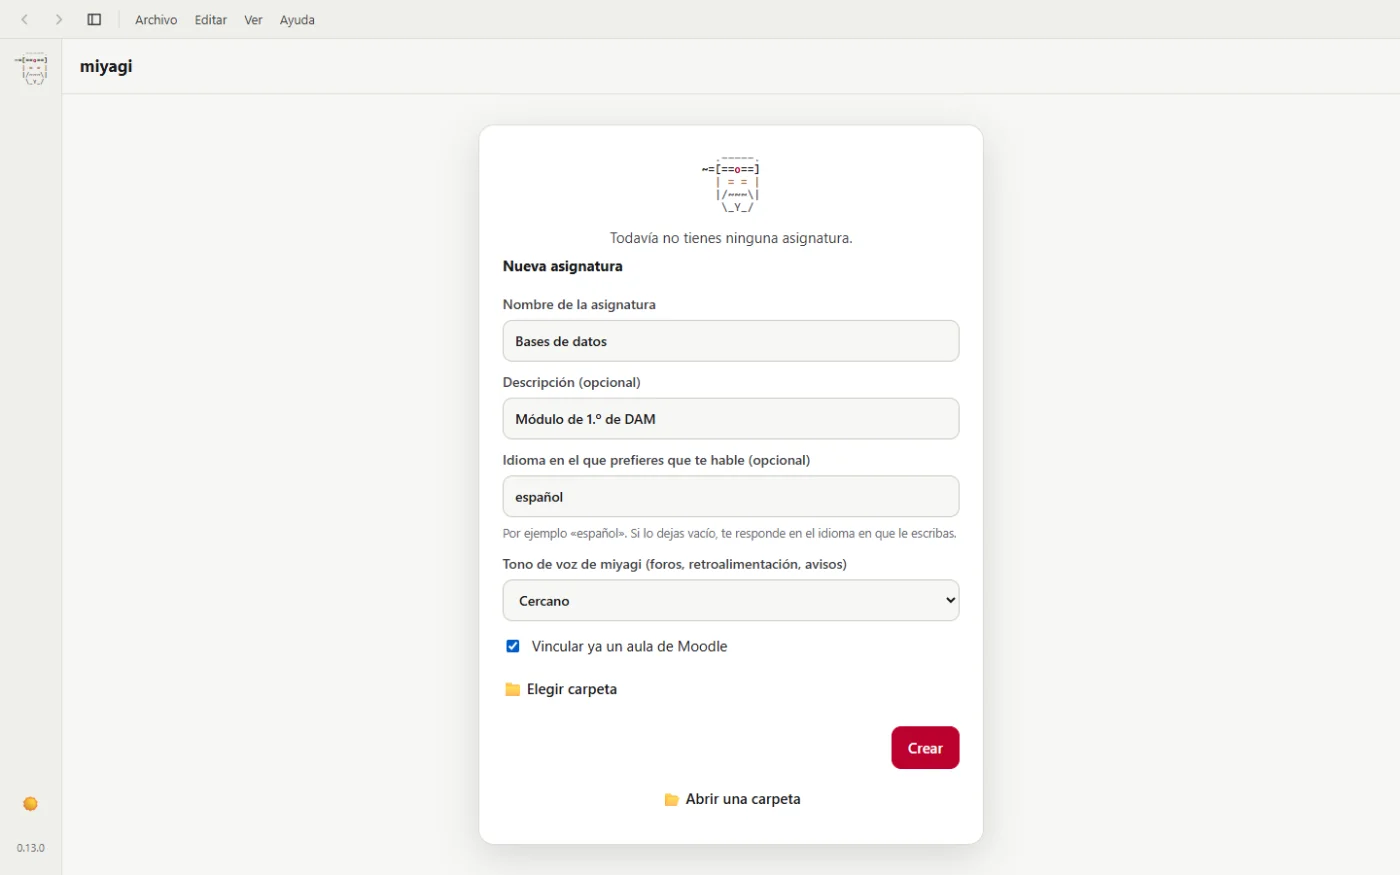
The subject is saved in miyagi's folder (~/.miyagi/workspaces/<name>/, on Windows C:\Users\<your-user>\.miyagi\workspaces\), outside the folders that sync with the cloud. With Choose a folder you can keep it somewhere else.
Inside you'll find this:
bases-de-datos/
  config.json        your subject and your Moodle's address (the assistant can't read it)
  instructions.md    your standing instructions, if you create them
  sources/           this is where you put YOUR documents: teaching plan, rubrics, solutions
  knowledge/         this is where IT writes: its notes on the course
  drafts/            what it prepares for Moodle before uploading it
2. Link your classroom (optional)
In Your classroom, click Link a classroom and paste your course's address, the one you see in the browser, something like https://moodle.myschool.edu/course/view.php?id=42. From it, it works out your Moodle's address and the course number. We explain it with screenshots in Linking your Moodle classroom.
It doesn't ask for a username or password. miyagi installs the moodle-teacher extension, which works in Moodle with your own session: the first time it goes into the course, a browser window opens for you to log in yourself, and it never sees your password. By default it can change your course, always asking your permission first, and your students reach it under an alias, never by their name.
Without a classroom, miyagi helps you just the same with the teaching plan, the units and the materials.
3. Give it your material
This step is optional, but it makes the difference. In the Memory view, Sources tab, drag in whatever you have: the teaching plan, the rubrics, the assignment briefs with their solution, your criteria (“late submissions, 20% off”). PDF, Word, PowerPoint (it also reads the speaker notes), Excel and text documents all work, and even photos of handwritten notes or of slides. Then click Ask miyagi to take them in.
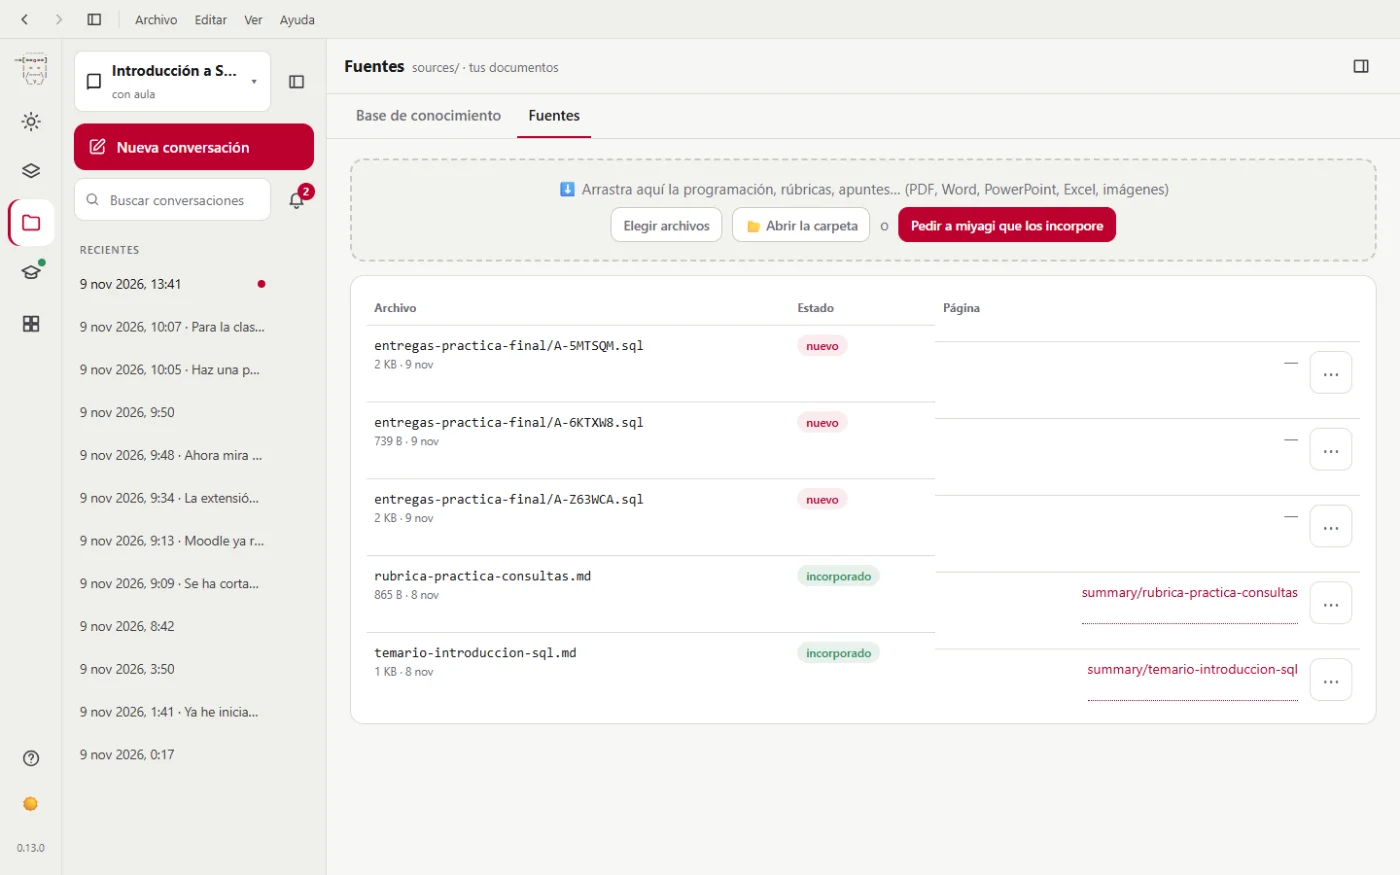
It reads your documents without opening Moodle and adds them to its notes: a summary of each one, linked to the unit or activity it belongs to. When grading, your criteria take precedence over its own.
When you add new documents, ask it again: it only processes the ones it didn't have yet.
4. Your first conversation
Click Talk to miyagi in Today, or New conversation. It greets you with what it already knows about the course, without going into Moodle yet. If it doesn't know anything yet, it offers to explore the course or read your documents.
A good first message, if you connected the classroom:
/miyagi:orient
It looks for the course guide, the welcome page or the general instructions, and notes how the course is assessed, the deadlines and where the class communicates. From there, ask it for whatever you need in your own words.
There's nothing to save: everything saves itself as it goes.
In the web version or in the terminal
The web version is the same page: miyagi web, and follow the same steps.
In the terminal, these are the equivalents.
Creating the subject: miyagi init
$ miyagi init
It will ask you these questions, one after another:
- Subject name, which is also the one you'll use with
-w. - Description, optional.
- Tone of voice.
- Language.
- Create
instructions.md? A file where you write the instructions you want it to always keep in mind, like “grade out of 10”. You can create it by hand later. - Connect a Moodle classroom now? By default, no. You can connect it whenever you want with
miyagi init -w <name>. If you say yes, it asks you for:- Moodle URL. The easiest way: copy your course's full address. From it, it works out your Moodle's address and the course number.
- Course ID. Only if the address you pasted didn't include it: the number after
id=.
If you've connected a classroom, at the end it offers to explore your Moodle now. We recommend saying yes: it goes into your course, looks at which activity and question types it sees there and how grades are calculated, and takes note of it. It doesn't create or change anything. If something fails (you don't manage to log in in the window, for example), the subject is set up anyway and you can repeat it whenever you want with miyagi explore.
If it's the first time you use miyagi on this computer, at this point it will ask you to connect your Claude account.
After that you open it by its name from anywhere, for example miyagi chat -w bases-de-datos. With plain miyagi it asks you which one you want to work with, and miyagi workspaces tells you which ones you have and which folder each one is in. If you'd rather use a folder of your own, create it with miyagi init --dir <folder>: it's also added to the list, and inside that folder miyagi uses it without you having to say so.
Giving it your material: miyagi ingest
Copy your documents into the subject's sources folder and:
$ miyagi ingest
You can also ask for it from the chat with /knowledge:ingest.
Talking to it: miyagi chat
$ miyagi chat
To exit, type /exit. There's nothing to save: everything saves itself as it goes.
Next step
- The conversation: how to approve, reject, interrupt and resume a conversation.
- What to ask it: ideas to get started, from simple to more ambitious.